Hair Clipper Guard Sets: Features, Fit, Maintenance, and Safety

Direct answer: choose a hair clipper guard set by exact clipper model and blade compatibility, manufacturer-stated cutting length, attachment mechanism, tooth spacing and finish, tab or spring condition, seating security, cleaning limits, storage, and replacement support. Similar-looking guards are not interchangeable, and tooth height alone does not establish the finished length because blade position, taper lever, hair angle, pressure, direction, and technique also matter. A guard does not establish skin safety, snag-free cutting, a fixed result, or suitability for every clipper, hair density, scalp, child, animal, or body zone.
Define the exact hair clipper guard set feature
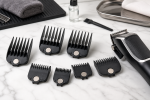
Guard sets may use snap tabs, hooks, rails, spring clips, double magnets, single magnets, or proprietary carriers. They may be identified by numbers, colors, millimeters, inches, or names, but use only the model-specific manufacturer mapping. Record the attachment points, usable tooth length, tooth spacing, sidewall, material, flex, declared cut length, storage method, and replacement source. Read the model and accessory directions before comparing category language. A material, mineral, ion, ceramic, heat-resistant, or professional-style term does not replace the electrical rating, temperature boundary, compatible surface, attachment list, or maintenance instructions.
Match dimensions and controls to the task
With the clipper switched off, match the guard to the listed blade and model. Confirm that hooks, tabs, clips, rails, or magnets engage completely; the guard sits square; teeth clear the moving blade; the taper lever can travel only where permitted; and light hand pressure does not cause rocking, release, twisting, or contact with the cutter. Check the complete working footprint and the space needed for hands, attachments, cord movement, cooling, and storage. A feature is useful only when the operator can reach controls, maintain clearance, and stop without crossing a hot or electrical surface.
Inspect before every use
Use bright light and dry hands. Look for cracks, loose parts, damaged coatings, sharp edges, blocked openings, distorted heat surfaces, exposed conductors, frayed insulation, bent plug blades, overheated marks, unusual odor, residue, or moisture. Do not operate equipment whose condition or required protection check is uncertain.
Build a dry, stable setup
Inspect every clean dry guard under bright light for bent, cracked, rough, missing, or spread teeth; white stress marks; loose metal parts; damaged tabs; debris; and unreadable identification. Select the longest suitable verified guard for the planned zone, prepare hair as directed, and keep unused guards organized outside the cutting path. Keep aerosols, paper, towels, plastics, children, pets, trip hazards, and loose hair away from heated or moving-air zones. Do not use an extension arrangement, adapter, voltage converter, attachment, or counter surface unless the exact directions permit it.
Start conservatively
Attach and remove guards only while the clipper is switched off. Recheck seating after any impact or unexpected vibration. Keep the guard face flat where directed, use light pressure, and stop for rocking, release, tooth flex, hair pulling, unusual blade contact, or a change in sound. Never hold a loose guard in place by hand during operation. Change only one variable at a time. More heat, longer contact, closer distance, wider sections, or repeated passes can increase exposure without proving that the category feature caused a better cosmetic finish.
Control section size and placement
Create sections that fit inside the actual heated face or airflow path without overlap, folded ends, compressed tangles, or blocked intake. Support the section, keep hot parts away from skin, and use a mirror or second viewpoint when blind placement could bring a tool close to ears, neck, scalp, cords, or attachments.
Use timing and distance evidence
Follow the stated contact time, motion, distance, and cooling instructions. A hand count is not a reliable timer, and a dial position is not a universal temperature. Record the actual model setting and stop early for discomfort, smoke, burning odor, snagging, unstable controls, or abnormal sound.
Judge the cooled result
Stop at the planned length map, brush away loose hair, and inspect under consistent light before changing guard, lever, direction, or pass count. Record the exact guard identification and clipper model rather than treating a visual tooth-height estimate as the cut result. One immediate result cannot establish long-term condition, heat exposure, feature output, or material durability. Repeat only after the tool, section, and work surface return to the required state.
Separate feature claims from observations
A smoother look, reduced static, defined wave, shorter recorded time, or comfortable handling is an observation under one setup. It does not prove ion generation, uniform heat, mineral action, fire resistance, strand repair, moisture preservation, or a result for another person, climate, outlet, product stack, or hair history.
Keep water and electricity separated
The CPSC household electrical-products guidance provides specific immersion-protection and electrical context for covered dryers; it does not certify every hair clipper guard set or accessory. Follow the exact device instructions, keep it away from water, and never retrieve plugged-in equipment from water.
Use conservative hair and product boundaries
The AAD gentle hair-care guidance supports limiting harsh handling and excessive heat without endorsing this tool category. The FDA hair-products overview provides cosmetics context but does not establish compatibility between a styling product, hair service, attachment, temperature, and hair clipper guard set.
Cool, clean, and store correctly
Remove the guard from the switched-off clipper, clear hair from every tooth and attachment point, clean or disinfect by the material directions, rinse only when permitted, dry all rails, tabs, springs, and magnet recesses, inspect again, and store in a divided organizer without loading or bending teeth. Never clean a hot or energized tool. Do not scrape coatings, immerse electrical housings, push debris deeper into an intake, or use solvent, bleach, oil, or compressed air unless the directions specify it.
Recognize the replacement or service point
Stop use for a cracked, bent, rough, spread, loose, missing, or permanently flexed tooth; damaged hook, tab, rail, spring, or magnet; guard that rocks, releases, contacts the blade, lacks traceable identification, retains residue, or no longer dries completely. A reset, tighter grip, hotter setting, taped cord, different outlet, or another cleaning attempt is not evidence that an electrical, heat, surface, coating, or mechanical fault is resolved.
Run a controlled hair clipper guard set comparison
Compare guards only on the exact compatible clipper and blade with the same hair context, lever position, direction, pressure, pass count, seating check, cleaning state, and stop rule while changing one manufacturer-defined guard size or attachment feature. Repeat on another routine day before generalizing. Keep the stop rule fixed and do not create a deliberate high-heat, water, overload, or fault challenge to compare consumer equipment.
Use related guides for separate decisions
The hair trimmer guide helps with separating complete-tool selection from component inspection. The body-hair trimmer guide covers keeping body-zone suitability model-specific. Use the beauty-supply checklist for planning the complete grooming station. These pages do not replace the exact hair clipper guard set electrical, heat, material, surface, or maintenance directions.
Record the final decision
Log clipper and blade model, guard identifier and stated length, attachment system, tooth dimensions and condition, seating and rocking check, lever position, zone, direction, pressure, passes, cut observation, cleaning, dry time, storage, and replacement date. Keep the item only while the feature disclosure is clear, the working setup remains controllable, every inspection passes, and the observed cosmetic benefit does not require ignoring heat, electrical, surface, hair, or maintenance limits.
Decision table
| Check | Useful evidence | Stop or revise when |
|---|---|---|
| Feature evidence | The exact component, material, coating, or mode is disclosed | A category word replaces model-specific evidence |
| Fit and controls | Dimensions, settings, attachments, and clearance match the task | The setup requires overlap, blocked airflow, or blind control |
| Heat use | The lowest effective permitted setup reaches a defined endpoint | Heat, time, distance, or passes escalate without a clear stop rule |
| Electrical condition | Housing, cord, plug, controls, and protection checks pass | Damage, odor, heat, sparking, smoke, or intermittent operation appears |
| Maintenance | Contact surfaces, vents, filters, mat faces, and attachments are clean and dry | Residue, blocked openings, moisture, damage, or odor remains |
Final checklist
- The exact hair clipper guard set feature, heat or use limit, controls, and compatible setup are documented.
- Housing, hot surfaces, attachments, counter area, cord, plug, and openings pass inspection.
- Section size, distance, timing, contact, and cooling endpoint are controlled.
- The item is switched off, unplugged when directed, cooled, cleaned, dried, and stored correctly.
- Damage, overheating, odor, smoke, sparking, unstable controls, or abnormal shutdown ends use.
Choose the complete setup, not the category word. Preserve the operating limits and stop when the evidence no longer supports continued use.