Lace Closure Sizes: Fit, Material, and Construction Guide

Direct answer: Choose a lace closure size by matching its actual finished width, front-to-back depth, corner shape, parting field, density map, and reinforced perimeter to the intended crown opening and surrounding weft plan. A closure covers a limited top or crown area; it is not designed to span the full temple-to-temple hairline like a frontal. Measure the prepared base and closure at rest, center both reference lines, and inspect every perimeter junction before attachment. A larger closure can add parting room but also creates a longer seam, more knot area, and a different load path. Reject buckling, exposed gaps, asymmetry, widened mesh, failed perimeter reinforcement, or a footprint that cannot seat flat.
Measure the closure as a crown-only footprint
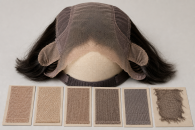
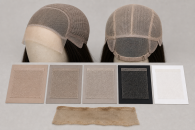
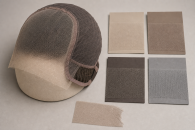
Lay the closure flat without stretching and record finished lace width at front, midpoint, and rear, plus center depth, side depth, corner shape, parting field, knot margin, reinforced perimeter, and hair direction. Map where the closure sits on the top or crown and where surrounding wefts begin. Preserve actual measurements rather than relying on nominal size names.
Define the intended crown opening
Mark the front center, top center, crown direction, side boundaries, and the line where surrounding wefts or prepared hair will meet the closure. Record width at more than one depth because the opening may taper. Do not choose a closure by hairstyle photo alone. The same nominal width can sit differently when corner shape, crown depth, and perimeter curvature change.
Measure finished lace, not loose overhang
Distinguish usable ventilated area, reinforced perimeter, and any uncut lace extension. Record front, middle, and rear width plus center and side depth while the piece is relaxed on a flat support. Do not stretch mesh to reach a catalog number. A loose front tab does not add supported parting area, and a bound edge can reduce the usable footprint.
Map the parting field inside the perimeter
Identify free-part, middle-part, multi-part, or other maker-defined ventilation only where current evidence supports it. Record hair direction, density transitions, knot pattern, and the distance from each usable part to the reinforced seam. A broad outer rectangle does not guarantee equal parting in every zone. Do not infer unrestricted styling from size alone.
Compare corner and edge geometry
Inspect square, rounded, curved, or tapered corners and the way front and side edges meet. Corners influence how a closure joins surrounding tracks and where tension concentrates. Record folds, binding, seam tape, raw lace, and hairline shaping. Trimming a corner before the dry layout passes can remove the reference needed to diagnose a gap.
Plan the surrounding weft junction
Lay the closure over the intended opening and trace where the final track, braid, cap panel, or other supported base will meet it. Check seam allowance, stitch route, adhesive exclusion, density transition, and access for later removal. A closure should not be forced wider by pulling its sides to meet distant tracks. Rebuild the opening rather than loading fine mesh.
Check centerline and directional symmetry
Align the closure center with the prepared base and compare left and right depth, corner position, hair direction, and perimeter distance. Rotate only within the planned geometry. A centered front edge can still leave a skewed crown or uneven side seam. Document natural asymmetry instead of concealing it with different attachment force on each side.
Dry-fit without turning it into a frontal
Position the closure over the top opening and keep its side limits within the intended crown footprint. Check front transition, crown lay, parting access, seam visibility, and movement while all bond products remain absent. If the reader needs continuous temple coverage or ear-tab geometry, evaluate a frontal rather than extending a closure with tension or extra loose lace.
Balance density with the neighboring hair
Compare strand concentration at the front, center, rear, and sides with the surrounding wefts or natural-hair plan. Record abrupt steps, sparse knot fields, bulky seams, and direction conflict. Density percentages and light or full labels may use different methods. Add no unsupported hair or aggressive plucking merely to make two systems appear continuous.
Protect the complete perimeter during attachment
Follow only the documented sewing, clip, tape, adhesive, or other route. Support the opposite side while each section is secured so the rectangle does not become a stretched diamond. Keep needles, products, and remover within approved zones. Stop for pain, repeated pulling, corner lift, or mesh distortion instead of adding force.
Release every side before lifting the center
During takedown, identify and unload the front, two sides, and rear perimeter separately. Keep the closure broad and supported while thread, clips, tape, or bond releases. Do not lift by the hair or pull from one corner across the entire mesh. After removal, compare edge length, corner shape, knots, and relaxed dimensions with the intake record.
Retire a footprint that no longer returns
Set aside the closure for connected enlarged openings, torn corners, failed binding, seam separation, permanent diagonal stretch, displaced knot fields, hard residue, discoloration, or a perimeter that no longer matches its measurements. A new part, tighter braid, added track, or heavier adhesive does not restore the original geometry.
Decision table
| Checkpoint | Continue when | Stop or replace when |
|---|---|---|
| Footprint | Relaxed width, depth, corners, and centerline match the planned crown opening | Mesh is stretched or rotated to cover missing area |
| Parting | Usable field and hair direction stay inside supported margins | Outer size is mistaken for unrestricted parting |
| Perimeter | Front, sides, and rear join evenly with visible service access | Gap, buckle, loaded corner, or hidden attachment |
| Density | Closure and neighboring hair transition without forced alteration | Abrupt bulk, sparse zone, direction conflict, or unsupported plucking |
| Condition | Mesh, knots, reinforcement, and dimensions return near baseline | Tear, widening, separation, residue, stain, or permanent skew |
Use scalp guidance as a fitting stop rule
AAD sources support avoiding painful or repeated pulling but do not select a closure size. FDA context applies to cosmetics or adhesives under their own directions. Actual closure dimensions, crown opening, perimeter construction, product-free layout, and observed condition control.
- AAD traction guidance: Stop when perimeter placement creates repeated pulling.
- AAD extension precautions: Keep attachment clean and avoid excess tension.
- FDA hair-products overview: Review each cosmetic separately from closure dimensions.
Choose hair and attachment after defining the closure footprint
Extension resources help classify fiber, shade, and attachment choices. They do not establish crown opening dimensions, closure parting area, or perimeter geometry.
- hair extension selection guide: keeping extension fiber and attachment choices outside this wig-equipment decision
- hair extension type guide: separating extension formats from a complete wig and cap system
- hair crown extension guide: handling shade and placement as a separate reader task
Final checklist
- Finished width, depth, corners, perimeter, and usable parting field are measured at rest.
- The intended crown opening and surrounding weft route are recorded.
- Centerline, side depth, density, and hair direction align without stretching.
- Every perimeter side remains accessible for supported attachment and release.
- Widened mesh, torn corners, failed reinforcement, residue, or permanent skew triggers retirement.
A larger closure does not guarantee a better result
This guide does not promise styling freedom, realism, comfort, secure wear, hold duration, easy installation, hair retention, or damage-free removal.
A closure size is a crown-opening, relaxed-width, depth, corner, parting, perimeter, density, attachment, release, and condition decision.