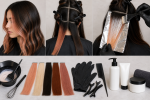
Reverse Balayage: Placement, Sectioning, and Upkeep Guide

Direct answer: reverse balayage adds selected darker or more neutral ribbons back into hair that is predominantly light, restoring depth while preserving some brightness. Plan it by documenting the current light and dark areas, choosing how much contrast should return, mapping lowlights through the interior rather than covering every blonde piece, strand-testing deposit on porous hair, and deciding how the added depth should fade and grow.
Traditional balayage usually creates or emphasizes lighter pieces. Reverse balayage moves in the opposite visual direction: it uses deposit and strategic depth to reduce an over-light, flat, or disconnected appearance. It is not automatically a full brunette change, a uniform root shadow, or color correction for every unwanted blonde result.
Define the desired depth ratio
Describe the target as a ratio of preserved lightness to added depth. A light-dominant result keeps most blonde visible and inserts narrow lowlights. A balanced result distributes light and dark ribbons more evenly. A depth-dominant result leaves selected brightness around the face or perimeter while rebuilding a stronger brunette or dark-blonde interior.
Choose the primary viewing angles: front, side, back, and gathered hair. The same number of lowlights can look sparse on dense hair and dominant on fine hair. Record whether the target needs softness at the root, depth through the middle, darker ends, or a combination. Do not start with a formula until these placement decisions are explicit.
Audit the existing light canvas
Divide the hair into natural regrowth, earlier lowlights, pale highlights, warm bands, and porous ends. Note whether previous lightener, permanent color, toner, direct dye, or home color is present. Highly lightened sections may absorb darker pigment quickly, while healthier or less porous pieces may stay lighter with the same contact time.
Assess the canvas dry under indirect daylight and indoor light. Wet hair appears darker and can hide uneven porosity. Photograph the root, crown, sides, nape, mid-lengths, and ends. A complete canvas map helps prevent a reverse balayage from becoming an accidental all-over dark result.
Choose lowlight depth and undertone
A lowlight should relate to both the desired finish and the pigment missing from the lightened canvas. Moving much darker can require a supported fill or pre-pigmentation step so the result does not appear hollow, muddy, overly cool, or unpredictable. Product systems define fill and deposit differently, so use the selected manufacturer’s directions rather than a generic online ratio.
Choose whether the lowlight should be warm, neutral, or cool, then test it against the retained blonde. Warm depth can reconnect a golden or copper palette. Neutral depth can soften contrast without creating a strongly warm or ashy statement. Cool depth may suit a cool target but can look flat on very pale, porous hair if the formula lacks an appropriate underlying balance.
The gray hair transition guide offers a useful comparison for managing visible boundaries between lighter and darker sections. Reverse balayage has a different goal, but both require a plan for where natural growth, deposit, and retained lightness meet.
Map lowlights around the haircut
Place depth where it supports the haircut and preserves intentional brightness. Interior ribbons can rebuild shadow under a light surface. Deeper nape pieces can add weight without darkening the face. A controlled root area can reconnect regrowth, while selected face pieces remain light. Ends may need fewer lowlights if they are fragile or if the target keeps brightness at the perimeter.
Use diagonal, vertical, or curved partings according to the desired movement. Fine weaves create diffuse depth. Wider slices create graphic ribbons and stronger contrast. Alternating starting heights prevents every lowlight from forming one horizontal band. Release the hair several times during mapping to confirm that the depth reads correctly in its natural fall.
Strand-test deposit on representative zones
Test at least one pale porous piece and one less-porous mid-length when those zones differ. Record the exact product, shade, ratio, subsection thickness, saturation, processing time, rinse method, and fully dry result. Judge depth, undertone, shine, evenness, and whether the lowlight remains distinct from the preserved blonde.
A strand that looks correct immediately after rinsing may still dry darker or cooler than expected. If the porous end grabs too much, revise the formula, contact time, zone plan, or professional-service decision before scaling up. If the lowlight disappears against the blonde, increase contrast through placement or a tested formula change rather than simply adding more sections.
Prepare separate formula and isolation controls
Gather labeled bowls outside the active color area, brushes, gloves, clips, a tail comb, foils or another supported barrier, towels, and a timer. Keep retained blonde pieces isolated from darker deposit. If roots, interior lowlights, and ends need different formulas or timing, assign each a separate zone and processing clock.
Do not mix brands, developers, additives, or processing instructions unless the current labels explicitly permit the combination. Measure enough product for even saturation. Running short can produce faint or patchy lowlights, while oversaturating beyond the mapped section can stain brightness intended to remain.
Apply depth without losing the light pattern
Work through the predetermined map and count the retained light spaces as carefully as the dark sections. A reverse balayage succeeds through negative space: the blonde left untouched is part of the design. Check both sides of each foil or barrier before closing it, and keep the section border clean at the root and through the ends.
When multiple zones process differently, follow the test-supported order rather than beginning everywhere at once. Rinse according to the label while limiting contact between fresh dark pigment and pale lengths. Reassess the dry color before adding a gloss or toner; an automatic all-over finishing formula can flatten the contrast that the lowlights created.
Use gloss only for a defined finishing job
A gloss may refine retained blonde, soften lowlight undertone, or unify shine when the selected product and canvas support that job. It cannot restore missing placement or undo lowlights that are too wide or too dark. The site’s hair gloss guide explains how to compare tone, deposit, processing, and fade before adding a separate finishing step.
Plan for fade and regrowth
Added depth can release faster from highly lightened hair. Some lowlights may become warmer, lighter, or less distinct after washing. Root growth may reconnect naturally with the depth, or it may create a new boundary if the natural level differs from the lowlight. Set an acceptable fade endpoint and photograph the original section map for future reference.
Maintain root connection, lowlight deposit, retained-blonde tone, and condition as separate decisions. A root refresh does not automatically require pulling dark color through every length. A tonal refresh does not automatically require new lowlights. The oil slick hair color guide provides additional context for maintaining multiple dark and light ribbons without assuming that every shade fades at the same rate.
Follow hair-color safety boundaries
Follow each current product label, including preliminary test instructions, gloves, timing, rinsing, and restrictions. The FDA hair-dye guidance notes that reactions can occur even after earlier uneventful use and states that scalp hair dye is not for eyebrows or eyelashes. Do not apply over an irritated or damaged scalp.
The American Academy of Dermatology coloring guidance recommends conservative color changes and following manufacturer testing directions. These sources support precautions, not one reverse-balayage formula or an assured outcome. Extensive breakage, unknown chemical history, severe banding, or a large depth change is a reason to seek a qualified color professional.
Reverse-balayage planning checklist
- Choose a preserved-light to added-depth ratio.
- Map regrowth, pale highlights, bands, porosity, and fragile ends.
- Select lowlight depth and undertone from the real canvas.
- Decide whether a manufacturer-supported fill step is needed.
- Test pale and less-porous zones and judge the fully dry result.
- Map ribbon width, spacing, starting height, and negative space.
- Isolate formulas and protect brightness intended to remain.
- Maintain roots, lowlight deposit, blonde tone, and condition separately.
Reverse balayage works when restored depth is planned as structure rather than used as a blanket correction. A recorded canvas, controlled lowlight ratio, representative tests, and fade-aware upkeep preserve the dimensional relationship between the new shadows and the light pieces that remain.