Curved Needles for Wig Making: Selection, Use, Cleaning, and Replacement

Direct answer: Choose a curved needle for wig making by matching its arc radius, shaft length and thickness, eye size, point, and metal finish with a defined off-head sewing path on a stable wig block. The curved shaft should rotate through the material along its arc without forcing the point toward the supporting hand. Count every needle before and after work, park points inside a designated cork zone, and replace any bent, burred, corroded, rough, or distorted needle.
Catalog the arc before threading
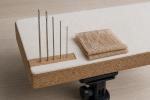
On a controlled cork surface, record each needle's tip-to-eye length, arc radius, shaft thickness, eye size and finish, point condition, metal surface, and starting count. Keep accepted needles, rejects, and active tools in separate locations throughout the session.
Choose an arc for the access path
A shallow curve can span a broader path, while a tighter arc changes entry, rotation, and exit geometry. Compare the arc with cap depth, weft edge, seam allowance, and available hand clearance on the mounted block. The shape should permit a visible rotating motion; it should not require straight-line pushing, side bending, or blind force behind the material.
Inspect point, shaft, and eye as separate zones
View the point under bright light for burrs, hooks, flattening, or asymmetry. Follow the curved shaft for kinks, pitting, coating loss, residue, or an altered radius. Check both sides of the eye for sharp edges that can cut thread. Do not sharpen, straighten, polish, or bend a questionable needle back into service.
Thread outside the active sewing path
Move one accepted needle from its counted holder to a clear threading area. Cut thread only with a separate controlled tool away from the needle zone, then return that tool to storage. Pass a clean thread end through the eye without placing the needle in clothing, upholstery, hair, or a mouth. Keep the point embedded in cork whenever practical during setup.
Plan entry, rotation, and exit
Mark the stitch route in the work record and identify where the point will enter, travel, and emerge. Keep the supporting hand to the side of the predicted arc, never behind it. Insert by controlled rotation that follows the needle curve. Stop at unexpected resistance rather than increasing force or changing the arc by levering the shaft.
Limit each bite to visible material
Capture only the intended cap, lace, weft edge, or seam allowance permitted by the construction plan. Avoid block canvas, hidden hardware, elastic channels, hair fibers, and excessive material thickness. The point should emerge in a visible clear zone before more thread is drawn. A larger bite does not establish a stronger or safer seam.
Control thread without using the needle as a lever
Draw thread along the stitch path while supporting the material and maintaining a visible loop. Resolve tangles before tightening. Do not twist the curved needle to pry apart layers, pull a knot through fragile lace, or use the eye as a hook. If the thread repeatedly frays at the eye, stop and inspect both thread and metal.
Park the active needle by the eye-up rule
Between stitches, place the point fully inside a dedicated cork parking zone with the eye and curved shaft visible. Keep that zone outside the material path and away from the table edge. Never lay the needle loose, hide it under hair, stick it into fabric furniture, or leave it suspended from thread.
Remove and count before any fitting
At the end of sewing, follow the cap edge visually and remove all construction pins or needles from the block and material. Reconcile accepted, rejected, and parked counts. No person should approach or wear the unit until the needle count closes. A missing needle stops cleanup, transport, fitting, and publication work.
Use only a metal-compatible care method
Follow the needle directions for cleaning or disinfection, then dry point, shaft, and eye completely. Keep unapproved solvents, oils, abrasives, and mixed-metal soaking outside the process. Cleaning cannot restore the original arc, remove a burr safely, close a cracked eye, or reverse corrosion.
Enclose points and retire defects
Store accepted curved needles in rigid fitted channels or another closed system that prevents point exposure and preserves the arc. Replace for any bend outside the original curve, kink, burr, hooked or blunt point, rough eye, corrosion, pitting, flaking, residue, uncertain cleanliness, or count discrepancy. Use an appropriate sharps-safe disposal route.
Decision table
| Checkpoint | Continue when | Stop or replace when |
|---|---|---|
| Arc | Original curve matches the visible access path | Kink, altered radius, blind force, or side bending |
| Metal | Point, shaft, and eye are smooth and clean | Burr, hook, corrosion, pitting, or rough eye |
| Motion | Needle rotates through a predicted visible route | Straight pushing, levering, or hidden exit |
| Parking | Point is fully inside the designated cork zone | Loose tool, hidden point, or dangling thread |
| Count | Starting and closing totals reconcile | Any curved needle remains missing |
Do not convert construction-tool control into a wear claim
AAD guidance supports avoiding harmful pulling in the final hairstyle, but it is not a curved-needle technique source. FDA hair-product material does not approve sewing metal or a cleaning method. The needle remains an off-head sharp tool with a closed count requirement.
- AAD hairstyle traction overview: Apply it after every sharp tool is removed from the completed unit.
- FDA hair-products information: Do not infer needle finish or cleaner compatibility from cosmetic oversight.
- AAD extension precautions: Keep the later wear system from relying on painful tension.
Close the curved-needle count before hair selection
Only after every point is enclosed should the related hair guides support fiber, format, shade, or upkeep decisions.
- hair crown extension planning: starts after construction tools are cleared
- extension selection guide: separates hair attachment from needle geometry
- extension format guide: keeps product format outside sharp-tool handling
Final checklist
- Arc radius, shaft length, eye, point, finish, and starting count are recorded.
- The supporting hand remains outside the predicted rotating path.
- Every pause returns the point fully inside the dedicated cork zone.
- The completed unit stays off a person until all needles are removed and counted.
- Accepted curved needles enter rigid enclosed storage without changing their arc.
Limit evidence to the controlled sewing session
A clean reconciled curved needle demonstrates only that the tool was controlled during the recorded off-head task. It does not establish seam strength, installation safety, scalp protection, professional skill, or a cosmetic outcome.
Curved-needle control follows the arc: inspect, predict, rotate, park, remove, recount, and enclose. Any hidden point or missing tool ends the workflow until it is resolved.