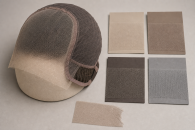
Lace Frontal Sizes: Fit, Material, and Construction Guide

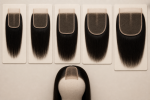
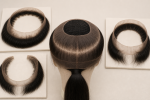
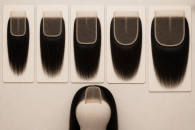
Direct answer: Choose a lace frontal size by matching its actual curved hairline span, rear width, front-to-back depth, temple turns, side returns, ear tabs, parting area, and rear seam to the prepared front arc. A frontal extends across the front hairline and is wider than a crown-only closure, but it still does not wrap continuously around the nape like a 360 frontal. Center the nose-to-crown reference, align both temple landmarks, and confirm ear clearance before any attachment. Size up only when the extra depth and seam length serve the planned parting and installation. Do not stretch mesh to reach the ears, cut tabs before the dry fit passes, or hide a rear gap with tension.
Map the frontal across the complete front arc
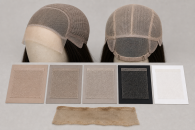
Record relaxed width along the frontal's curved hairline and straight rear edge, center depth, temple depth, side returns, ear-tab position, corner angle, parting field, knot margin, rear reinforcement, and hair direction. Compare these dimensions with the prepared temple-to-temple or ear-to-ear route and the planned rear junction. Keep nominal size labels separate from measured geometry.
Measure the curved route, not only a straight line
Record the intended hairline path from one temple or ear landmark across the front to the other. Also preserve a straight reference width so seller dimensions can be interpreted. A tape held in the air can understate a curved route, while a deeply arched frontal can have the same straight width as a shallower design. Use both geometry and landmark evidence.
Separate center depth from temple depth
Measure front-to-back distance at center, both off-center parting zones, and near the side returns. Frontal depth can taper, and a catalog number may describe only the deepest point. Map where usable lace ends and rear reinforcement begins. Do not assume a deep center provides equal side parting or a rear seam that aligns with every braid pattern.
Inspect the hairline arc and temple turns
Lay the frontal relaxed and compare the front contour, peaks, recessions, side curvature, and symmetry. Identify whether temple turns follow the intended base or require unsupported pulling. A dramatic pre-shaped hairline may not match the reader's landmarks. Do not cut or pluck it into another geometry before proving the cap and rear junction.
Place ear tabs without covering or pulling the ear
Locate each tab, its reinforced base, hair density, edge shape, and relationship to the side return. During the dry layout, confirm that the tab reaches its landmark without folding onto the ear or loading fine lace. A frontal that is wide enough at center can still have misplaced tabs. Maximum side tension is not a sizing method.
Define the rear junction across the front field
Trace where the straight or curved rear edge will meet wefts, a cap, braids, or another supported base. Record seam allowance, corners, overlap, density transition, and removal access. More frontal depth lengthens this interface and can shift it into a high point on the crown. Do not bury an uneven rear edge beneath added hair.
Audit the usable parting map
Record which front, center, and side zones the maker supports for parting and how close each lies to knots, seams, or reinforced edges. Parting freedom depends on ventilation and density, not just outer dimensions. A wide frontal can still have a narrow ventilated field or directional hair that limits a planned style.
Center before balancing the sides
Align the frontal center with the prepared front and crown references. Then compare left and right temple reach, ear-tab height, corner location, rear depth, and density. Do not pull one side farther merely because the other reaches first. Mark asymmetry and decide whether the preparation or frontal geometry needs correction before any attachment.
Dry-fit through ordinary movement
With no tape, bond, tint, or cosmetic, observe the front edge, temple turns, tabs, rear seam, and crown transition during slow head turns, jaw movement, sitting, and changes in gaze. Log ripple, lift, slide, corner pressure, and mesh narrowing. A frontal that lies flat only under hand tension has not passed fit.
Keep attachment inside structural zones
Follow the exact cap and product directions for sewing, clips, tape, adhesive, or a glueless route. Keep product off hair, eyes, broken skin, and unsupported mesh. Distribute force across intended reinforcement rather than concentrating it at the temple corners. Stop for discomfort, whitening or narrowing mesh, or movement that worsens with adjustment.
Release temples and rear seam methodically
Open hardware and rear attachment before lifting either front corner. If bond is used, soften and release small supported sections according to current directions. Do not peel from one ear to the other, pull by hair, scrape knots, or cut near skin. Inspect both temple turns because damage often begins where the front arc changes direction.
Retire loss of frontal geometry
Quarantine the piece for a torn tab, connected enlarged holes, displaced hairline knots, rear seam separation, permanent diagonal stretch, hardened residue, discoloration, or a front arc that no longer returns to baseline. Added bond, smaller braids, makeup, or a deeper cut cannot repair structural change.
Decision table
| Checkpoint | Continue when | Stop or replace when |
|---|---|---|
| Front span | Curved hairline and straight references match both temple landmarks | Mesh must be stretched to reach the sides |
| Depth | Center and side depths support the planned parting and rear seam | One nominal depth is assumed across the panel |
| Ear tabs | Both tabs clear the ears and load reinforced bases evenly | Fold, pressure, wrong height, or asymmetric pull |
| Rear junction | Edge meets the planned base with even serviceable overlap | Gap, buckle, buried seam, or concentrated corner load |
| Condition | Arc, knots, tabs, seam, and relaxed measurements remain stable | Tear, widening, separation, residue, or permanent distortion |
Use health guidance to limit frontal tension
AAD guidance supports avoiding painful repeated pulling but does not select frontal width, depth, or tabs. FDA context governs any cosmetic, adhesive, or remover only through its own directions. Measured landmarks, the relaxed frontal, product-free movement, and observed condition control.
- AAD traction guidance: Do not pull temple corners to make a frontal reach.
- AAD extension precautions: Use clean attachment and stop when the system causes pain.
- FDA hair-products overview: Keep cosmetic claims separate from structural fit.
Resolve the front geometry before selecting hair extras
Related extension pages address hair and attachment categories. They do not set temple span, frontal depth, ear-tab position, parting field, or rear-seam geometry.
- hair extension selection guide: keeping extension fiber and attachment choices outside this wig-equipment decision
- hair extension type guide: separating extension formats from a complete wig and cap system
- hair crown extension guide: handling shade and placement as a separate reader task
Final checklist
- Curved and straight widths, center and side depths, tabs, corners, and rear seam are measured.
- Both temple and ear landmarks align with the centered frontal at rest.
- Parting and density stay within the supported ventilated field.
- The product-free movement check passes before attachment.
- Torn tabs, widening holes, displaced knots, seam failure, residue, or distortion trigger retirement.
Frontal dimensions do not guarantee a natural or secure fit
This guide does not promise realism, comfort, invisible lace, styling freedom, hold duration, easy application, hair retention, or damage-free removal.
A frontal size is a curved-span, depth, temple-turn, ear-tab, parting, rear-junction, dry-fit, attachment, release, and condition decision.