Snap Wig Clips: Selection, Use, Cleaning, and Replacement

Direct answer: Choose a snap wig clip only after its curved plate follows the cap area, its teeth and rounded tips are smooth, its sewing holes are intact, and its pressure closure opens and closes without sticking or twisting. Map each clip to prepared hair before sewing it in. It should close without pinching skin, scraping the scalp, trapping loose strands, or concentrating pulling at one point. Clean and dry it by the disclosed method, and replace it for bent teeth, chipped coating, rough edges, cracked holes, corrosion, or a closure that no longer snaps predictably.
Inspect every clip in open and closed positions
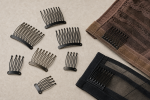
On a dry light-colored surface, photograph the top and underside of each clip while open and closed. Record plate length and curve, tooth count and tip shape, sewing-hole layout, hinge or pressure-bar movement, coating, rough areas, and the exact cap position proposed for that individual clip.
Identify a pressure clip rather than a sew-in comb
A snap clip uses a flexible plate or bar that changes curvature when pressed, bringing short teeth into a closed position. A stationary curved comb has no snap action and follows a different placement decision. Confirm the mechanism visually instead of relying on an accessory name, because mixing the two formats can produce the wrong sewing orientation and contact pattern.
Compare plate curve with the cap panel
Place the open clip against the intended dry cap panel without sewing. Its long axis should follow the panel and avoid seams, elastic channels, lace margins, closures, and other hardware. A plate that rocks or must be forced flat can distort the cap after stitching. Do not bend the metal or plastic to manufacture a new curvature.
Examine every tooth and terminal tip
Use bright side light to find hooked tips, sharp edges, burrs, uneven spacing, coating loss, residue, or a tooth that crosses its neighbor. Run no tooth over skin as a sharpness test. Compare visually with an unused accepted clip, and set aside any piece that could catch fibers or create a concentrated contact point.
Cycle the snap mechanism before installation
Open and close the clip several times over the controlled surface, keeping fingers outside the tooth path. The plate should change position smoothly and return to the same geometry without a delayed release, side twist, grinding sound, or loose hinge. A stronger-feeling snap is not evidence of safer hold and does not justify a difficult release.
Plan sewing through the designed holes
Use only the perimeter holes or slots intended for stitching. Mark their order on the cap and keep thread away from the moving plate, teeth, and pressure bar. Stitches should secure the base without puckering the panel or closing the mechanism. Do not drill new holes, wrap the active bar, or use adhesive as a substitute for a missing attachment point.
Map closure location against prepared hair
Before final stitching, simulate the closed position over the intended prepared-hair zone. Avoid sparse edges, tender areas, raised braids, knots, clips, scars, or a place where the teeth would repeatedly load a few strands. Several clips should not all direct force toward one small area. Change placement rather than adding pressure.
Open and close without catching loose strands
Expose the clip, support the cap, and separate nearby hair before pressing the plate. Confirm that teeth enter only the prepared section and that skin is outside the mechanism. To remove, release the snap fully before lifting the teeth away. Never drag a closed clip backward, pry it with a tool, or pull the wig until the plate opens.
Use a brief movement and pressure audit
After all attachments are set, turn the head slowly, look up and down, sit, and move the jaw. Check each location for shifting, scratching, pinching, concentrated pulling, deep marks, or a clip that opens. Stop for pain, burning, persistent itching, numbness, swelling, increasing tenderness, or a system that remains stable only with more clips or tighter placement.
Clean outside the cap when directions allow
If the clip is removable, count and detach it before cleaning; otherwise support the cap and follow the complete accessory and wig instructions. Keep unlisted solvents, abrasives, oils, and prolonged soaking away from coated metal, hinges, thread, lace, and elastic. Clear permitted residue from teeth and holes, then dry the underside and mechanism completely.
Retire the clip instead of reshaping it
Replace a clip for a bent or missing tooth, sharp tip, cracked plate, enlarged sewing hole, loose pressure bar, unpredictable snap, corrosion, pitting, flaking finish, persistent residue, or distortion after cleaning. Do not file a tip, repaint the surface, straighten teeth, or keep a weak clip in service by adding stitches around its moving parts.
Decision table
| Checkpoint | Continue when | Stop or replace when |
|---|---|---|
| Format | Pressure plate opens and closes to one repeatable shape | Stationary comb, twist, sticking, or uncertain mechanism |
| Teeth | Even spacing and smooth rounded terminals | Hook, burr, crossing tooth, break, or rough coating |
| Attachment | Designed holes secure a flat cap panel | Cracked hole, puckering, moving-part contact, or improvised glue |
| Wear check | Clip releases cleanly and contact stays distributed | Pinch, scrape, painful pull, deep mark, or accidental opening |
| Condition | Clean dry mechanism retains its original geometry | Corrosion, residue, flaking, distortion, or weak snap |
Use scalp guidance to limit placement claims
AAD guidance supports avoiding painful repeated pulling around wigs and extensions, but it does not certify a clip design or hold duration. FDA hair-product information applies to nearby cosmetics and cleaners, not to the mechanical strength or coating of a snap clip.
- AAD traction guidance: Regard pain and repeated localized pulling as reasons to change or stop the attachment.
- AAD extension precautions: Keep hair clean and avoid a clip arrangement that depends on damaging tension.
- FDA hair-products overview: Evaluate any cleanser or styling product by its own directions rather than assuming clip compatibility.
Choose the hair system separately from its clips
These related pages handle extension type, shade, and placement. They cannot establish that a snap mechanism fits one cap or prepared-hair area.
- hair extension selection guide: separates attachment-format questions from clip inspection
- hair extension type guide: keeps fiber and installation routes outside this hardware page
- hair crown extensions guide: addresses shade and placement after the clip decision
Final checklist
- Plate, teeth, tips, sewing holes, coating, and snap action are documented.
- The clip matches a flat cap panel without bending or crossing a seam.
- Prepared hair, skin, and loose strands stay outside the closing mechanism.
- Every clip releases before the wig is lifted or moved.
- Bent, rough, corroded, cracked, or unpredictable clips are replaced.
Describe one attachment check without promising hold
A smooth snap and comfortable brief check describe only the recorded clip, cap, placement, preparation, and session. They do not prove a secure wear duration, universal comfort, hair protection, or irritation-free contact.
A snap wig clip is a curved plate, tooth, sewing-hole, closure, placement, release, and condition decision. Keep it only while every part remains smooth, visible, and predictable.