Wig Combs: Selection, Use, Cleaning, and Replacement

Direct answer: Choose a sew-in wig comb by matching its stationary base curve, tooth length, spacing, rounded tips, and attachment openings with a stable cap panel and a prepared-hair zone that can accept the teeth without scraping skin or pulling a few strands. Sew only through the intended base openings, insert and remove the comb in its designed direction, and never regard a longer or denser tooth pattern as proof of stronger or safer hold. Replace the comb for bent teeth, rough tips, cracked bases, corrosion, or cap movement that persists after placement is corrected.
Measure the stationary comb before sewing
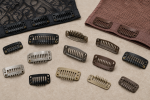
Record base width and arc, tooth count, usable tooth length, spacing, terminal shape, base openings, finish, and the proposed front-to-back orientation. Photograph the comb on the dry cap panel and beside the prepared-hair zone without inserting it.
Confirm the comb has no snap mechanism
A sew-in comb has a fixed curved base and stationary projecting teeth. It does not invert or click closed like a snap clip. Flexing a stationary comb to imitate a pressure clip can alter tooth alignment or fracture the base. Classify the component before planning direction, stitches, or contact.
Match the base arc to a stable panel
Lay the base against the intended cap area and observe contact from end to end. Avoid lace edges, closures, thick seams, elastic channels, strap anchors, and another piece of hardware. If the base bridges, rocks, or pulls the fabric when held lightly, choose another size or position instead of forcing the arc.
Evaluate length, spacing, and tip shape together
Long teeth reach farther into prepared hair but also change insertion angle and contact depth. Closely spaced teeth may collect more strands or residue. Inspect every terminal for a rounded smooth finish, parallel alignment, coating continuity, and freedom from burrs. A smooth-looking base does not excuse one hooked or crossed tooth.
Choose tooth direction before stitching
Determine which way the comb should enter and release according to the wig construction and accessory directions. Mark that direction on the work record. The base must not be sewn backward or positioned where removal requires dragging teeth against hair growth, a braid ridge, skin, or the cap edge.
Secure the base without wrapping the teeth
Place stitches through the designed holes or base spaces and keep thread clear of tooth roots. Alternate attachment points according to the construction plan so the cap lies flat and the comb cannot pivot. Do not bind individual teeth, pierce the cap at random, cover sharp damage with thread, or add adhesive to compensate for a cracked base.
Prepare an insertion zone rather than searching blindly
Separate and organize the intended hair section before placing the wig. Keep the comb visible, angle it by the documented route, and insert with a short controlled movement. Stop if teeth meet skin, hard resistance, a braid intersection, another accessory, or loose strands that cannot be released. Do not probe repeatedly for a place that feels secure.
Distribute attachment duties across the system
A comb is one component of cap fit, straps, elastic, and other disclosed attachments. Do not use additional combs to correct a wrong cap size or concentrate multiple rows at the hairline. Reassess the entire system when one comb carries most of the movement or when stability requires pressing the teeth more deeply.
Release in the reverse route before lifting
Support the cap near the base, clear surrounding hair, and withdraw the comb along the same path used for insertion. Confirm that all teeth are free before moving the wig. Never pull upward while teeth remain engaged, rock the comb side to side, or use a pointed tool to release tangled strands.
Clear residue without changing tooth geometry
Follow the disclosed cleaning method for the comb material, coating, thread, and cap. Remove loose hair from the roots by a permitted blunt method, not by levering teeth apart. Avoid abrasive pads, unlisted solvents, prolonged soaking, and high heat. Dry the base underside, openings, roots, and tips before storage or wear.
Replace at the first structural contact defect
Retire a comb for a bent, crossed, loose, sharp, or missing tooth; rough terminal; cracked base; enlarged opening; flaking surface; corrosion; persistent residue; or repeated cap pivoting. Do not straighten teeth, grind tips, coat damage, or sew over a fracture. One defective tooth changes the contact route for the whole comb.
Decision table
| Checkpoint | Continue when | Stop or replace when |
|---|---|---|
| Base | Stationary curve lies flat on the selected cap panel | Rocking, bridging, crack, or forced curvature |
| Teeth | Length, spacing, alignment, and tips suit the prepared zone | Hook, cross, burr, break, or skin contact |
| Direction | Insertion and withdrawal follow one visible route | Blind probing, side rocking, or backward placement |
| Load | Comb shares movement with a correctly fitted system | One comb carries tension or compensates for wrong size |
| Cleaning | Roots, openings, underside, and tips are clean and dry | Residue, corrosion, coating loss, or altered geometry |
Keep comb mechanics separate from dermatology evidence
AAD material supports reducing repeated traction and responding to pain, not choosing tooth count or insertion depth. FDA hair-product material does not approve comb coatings or cleaning methods. Mechanical conclusions must stay within the inspected accessory and cap.
- AAD extension precautions: Use gentle preparation and avoid attachment that depends on excessive tension.
- AAD hairstyle traction guidance: Localized pulling or pain requires a change in the worn system.
- FDA hair-product context: Keep cosmetic and cleanser directions separate from comb construction claims.
Resolve extension format before placing a comb
Extension and crown guides help select the broader hair system. They do not change the stationary comb's curve, tooth condition, or release path.
- hair extension type guide: defines the hair format before accessory placement
- hair extension selection guide: routes attachment-method choices outside tooth geometry
- hair crown extensions guide: keeps shade and coverage separate from comb fit
Final checklist
- The accessory is confirmed as a stationary sew-in comb, not a snap clip.
- Base curve and sewing points lie flat on a stable cap panel.
- Every tooth is aligned, smooth, rounded, and visible during insertion.
- Withdrawal frees the complete tooth row before the wig moves.
- Any structural, coating, or contact defect triggers replacement.
Limit conclusions to visible comb behavior
A stationary comb that inserted and released cleanly during one brief check does not prove fixed hold, universal compatibility, scalp comfort, or hair protection. Report only the observed component, position, and session.
A wig comb is a base-curve, tooth, direction, stitch, insertion, release, and cleaning decision. Replace it before a small tooth defect becomes a repeated contact problem.