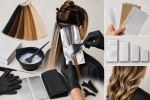
How to Choose and Use Balayage Boards at Home

Direct answer: choose a balayage board that supports the full width and working length of each section without forcing your wrist into an unstable angle. A useful home board has a secure grip, a smooth or lightly textured surface, a tapered edge that can slide under hair, and enough stiffness to resist bending while you paint. Pair its width with the brush and section plan. A board improves support and visibility, but it does not make complex lightening, major corrections, or hard-to-see back sections suitable for solo application.
This guide is about the board itself: size, grip, edge, surface, flexibility, brush pairing, cleaning, and replacement. It is not a universal balayage formula. Product directions determine mixing, permitted application methods, timing, strand testing, and whether professional help is the safer route.
Map the sections before choosing a board
Start with the intended placement. Face-framing pieces, narrow ribbons, broad surface panels, and long interior sections place different demands on a board. Draw a simple section map and note the approximate width and hair length in each zone. The board should support the selected hair from the painting area through the ends without swallowing neighboring hair.
A board that is much wider than the section can be awkward near the hairline and may collect loose strands. A board that is too narrow leaves edges unsupported and encourages the brush to push product beyond the intended section. If one plan contains both detail work and broad panels, use two purposeful sizes rather than one oversized compromise.
Review the at-home hair color planning guide before selecting tools. Starting condition, product amount, timing, visibility, and reach matter more than owning a specialized board.
Choose board length and width
Short boards are maneuverable around the face and on shorter hair. Their limited support becomes noticeable on long sections, where ends can fall away from the surface. Long boards support more hair and provide room for gradual saturation, but they require more wrist control and clear working space.
Narrow boards suit small sections and detailed placement. Medium widths cover many conventional freehand sections. Wide boards help with broad panels but can become heavy after repeated loading and may be difficult to position near the scalp. Compare usable surface dimensions, not the overall product length that includes the handle.
The board does not need to extend from scalp to the final tip in every technique, but it must support the active painting area. If the hair hangs beyond it, maintain control of the unsupported ends rather than dragging them through product on the board.
Evaluate the grip and leading edge
A handle should stay secure with label-directed gloves. Finger grooves can improve control when they fit your hand, while a flat handle may be easier to change between left and right orientations. Avoid a grip that requires constant squeezing or puts the wrist at a sharp angle. Test the tool dry before mixing anything.
The leading edge should slide under a clean section without scraping the scalp or snagging strands. A tapered edge can help lift and stabilize hair. A comb edge may assist section pickup, but it should not replace a separate clean sectioning tool when precision is needed. Sharp molding seams, cracks, or rough corners are reasons to reject the board.
Some boards include a raised lip or teeth. These features may improve grip, yet they can also interrupt brush movement or trap product. Select them only when they match the intended placement rather than assuming more texture means more control.
Balance stiffness, flexibility, and surface texture
A stiff board creates a predictable painting plane and supports longer hair. Too much stiffness can feel bulky around curved head areas. A slightly flexible board can follow contours, but it should not bow under normal brush pressure or spring product toward adjacent hair.
A smooth surface permits easy brush movement and quick visual checks. Light texture can reduce sliding. Deep texture may collect mixture, complicate saturation checks, and take longer to clean. Translucent boards can make product coverage easier to see in good light; dark or heavily colored boards may reduce contrast with some formulas.
Flex the clean board gently before use. Whitening plastic, permanent bending, loose bonded layers, or surface cracks indicate material fatigue. Do not use a damaged tool near hair or scalp.
Pair the board with the brush and section
The brush should fit comfortably inside the usable width. A brush that nearly spans the board leaves little margin for controlled feathering. A very small brush on a wide board adds unnecessary passes and can create uneven loading. Choose the brush for placement precision first, then make sure the board supports it.
Keep brush pressure moderate. The board supplies resistance; it should not be used to press hair flat with force. Load only enough label-directed mixture for the current strokes. Excess product on the board can transfer to the underside of a section or drip when the angle changes.
The hair color selection guide helps separate shade selection and formula questions from tool questions. A compatible board-and-brush pair cannot correct an unsuitable formula.
Set up a controlled work area
Arrange separate clean and active zones. Keep the cleaned board and dry sectioning tools away from mixed product until application starts. Protect clothing and nearby surfaces as the product label directs. Use bright, neutral lighting and mirrors that show the planned zones without requiring unsafe twisting.
Complete every label-required allergy alert or skin test and a strand test before the full service. Put on the directed gloves. Section and clip the hair so each planned piece can reach the board without crossing completed work. If you cannot see or reach a zone steadily, do not improvise by painting it blindly.
Use the board with controlled movement
Slide the leading edge under the selected section and support the hair without pulling. Hold the board at an angle that keeps the section stable and product away from the scalp unless the exact product and method direct otherwise. Paint within the mapped area using light, deliberate strokes, then inspect coverage before removing the support.
Wipe or exchange the board when accumulated product interferes with placement. Do not rest a loaded board on clean tools. Keep formulas separate if the plan uses more than one mixture, and use an unmistakable tool system for each. Follow the product timing from the start point specified by its directions.
Board support does not create a soft blend automatically. Section thickness, tension, brush loading, stroke direction, starting level, porosity, and product behavior all affect the visible transition.
Know the limits of solo freehand color
The U.S. Food and Drug Administration advises following all package directions, completing the directed skin test before every use, wearing gloves, keeping dye away from the eyes, observing processing time, and rinsing the scalp well. Stop if the label or your condition makes the application unsuitable.
The American Academy of Dermatology notes that lightening by more than three shades generally requires stronger peroxide and can cause more damage. Fragile hair, overlapping lightener, black artificial color, banding, major lift, previous chemical damage, and corrective work deserve professional assessment.
A board can improve support on visible front and side sections. It does not solve poor visibility at the back, guarantee even saturation, prevent irritation, or establish a safe processing time. Do not use it for eyebrow or eyelash color.
Clean, dry, and replace the board
Follow the tool manufacturer’s cleaning directions immediately after use. Remove product residue without using solvents, heat, abrasive tools, or soaking methods that the material does not permit. Pay attention to handle grooves, comb teeth, textured surfaces, and bonded edges.
Rinse only when the material instructions allow it, then dry the board completely before storage. Store it flat or in a position that does not bend the working surface. Keep it away from direct heat and from contaminated brushes or gloves.
Replace a board that remains stained in a way that obscures coverage, retains residue, develops cracks, warps, separates, or has a damaged edge. A low-cost tool is not worth keeping when its surface can no longer be inspected or cleaned reliably.
Common board mistakes
- Choosing by overall length without checking usable surface dimensions.
- Using one wide board for every detail section.
- Pairing a brush that leaves no clean side margin.
- Pressing hard enough to bend the board or force product through hair.
- Painting unseen back sections without controlled visibility.
- Letting product build up between sections.
- Assuming the board determines processing time or final tone.
- Storing the board wet, bent, or beside contaminated tools.
For color-placement inspiration and realistic upkeep questions, see the red hair ideas guide. Use inspiration to define placement, not to infer a universal formula.
Final selection checklist
- Map the section widths, lengths, and visible working zones.
- Choose a usable surface that supports each section.
- Confirm a secure gloved grip and smooth leading edge.
- Select stiffness that stays stable under normal brush pressure.
- Pair the surface width with the intended brush.
- Inspect the tool for seams, cracks, warping, and residue.
- Confirm cleaning and storage requirements.
- Keep formula, timing, safety, and professional-help decisions separate from tool choice.
Sources and scope
The FDA hair dyes guidance supports the label, skin-test, glove, timing, eye-area, scalp-condition, and adverse-reaction boundaries in this guide. The American Academy of Dermatology coloring guidance supports conservative shade changes and damage-reduction limits. Neither source endorses a balayage board size, material, brand, or technique.